Tuesday, April 26, 2011

Tea Cup Tuesday

Oh I have been so excited for this Tea Cup Tuesday hosted by the wonderful Terri and Martha.  I recently participated in a tea cup and gift swap with my Marie Antoinette group and received quite a beautiful package from my partner Wanda that I couldn't wait to share.

Here is the gorgeous cup she sent me.  I was so excited about the little yellow flowers on it as the reminded me of daisies.  And Wanda didn't know, but I love daisies because I had them in my wedding.  Then the more I looked at them I thought they might rather be sunflowers or black-eyed susans.  I asked my mom who was visiting for Easter what she thought, and she said, "They are what ever you want them to be."  Isn't that the sweetest kind of mommy answer?  I deem them daisies.

This view of the back shows the gorgeous shape of the cup.  Thinkin' I need to get a tea cup collecting book so I know more about all this.

The mark is pretty.  I am always attracted to the fancier markings, funny huh?

Look how beautifully Wanda packaged up all the extra goodies.

And here is what was inside... oh yes tiny squeals of delight could not help but escape from me.  A wall hanging filled with trims and two hankies, notecards (perfect for this stationery-ista), shortbread, coasters made in England, a really gorgeous card, the tea, and more...

Like this delicious little handmade pin cushion tart.

Or these rose frosted sugar cubes. They're so darling aren't they?

I love love love the spoon. I'm so new to this tea thing, it was totally unexpected and fun.

Here is some detail on the hanging.  Wanda made the adorable velvet flowers, I just love how she put it all together.

So you can see why I was totally blissed out with my tea cup swap. Thank you again Wanda for all the work you put into every detail. (More tiny happy squeals!) Yay!  I'll be sure to join in next week too and share the cup I sent to Wanda.


Monday, April 18, 2011

Domino Mini Book Part 3

This is the second Domino Mini Book I created and photographed the making of for my tutorial which you can see in PART 1, as well as photos and tips of the other book in PART 2.  Enjoy ma cheries.

Peachy alcohol inks with a paper Marie, a tatted flower and a rhinestone. For this book, I alcohol inked the edges of the domino also.

Lace and gold trim glued on with 3 in 1. 

The ten interior pages. 


For this cake set of 3 pages I cut the middle section exactly to match an interior BASE with no side borders. This makes the cake (or image) really look like all one piece when you open the book.


After alcohol inking the back I stamped with StazOn and attached rhinestones with Glossy Accents.

Well, there they are in all their itty bitty glory.  I hope you enjoyed seeing these come together, I would love to hear what you think or even see photos of yours if you try them.

Ciao Bellas!


Domino Mini Book Part 2

Ah now for more photos and little tidbits and tips on one of my finished Domino Mini Books.  You can see a tutorial on how to make these in PART 1 and photos and notes on the other book in PART 3.

Front cover: The tealy design is made by placing lace over the domino, adding alcohol ink, and allowing to dry before I removed the lace. Pretty cool huh? Then I just glued the paper Marie over that.
**The covers may seem like the hardest part, but really they are the most fun! :) There are tons of things you can do to them. Alcohol inks work great. Try Pearl with the brighter colors to make pastels. If you don't like how it's turning out, wipe it off with rubbing alcohol and begin again. :) The pleasure is in the process, just have fun! You don't even have to use alcohol inks, but this is a great place to try.**

I attached the rhinestones to the paper with Glossy Accents. And the paper and lace materials to the dominoes with 3 in 1. 

Here are the 10 teensy interior pages with all sorts of different decorations. 

Stamping and glitter paper. Notice I did distress ink the edges of the pages. 

Some music paper and glimmer misted dresden. 

For this double set of pages, I stamped directly onto the base paper. A little chancy, but if you mess up, you can always cover it. 

I stamped with StazOn on the back and attached a piece of punched glitter paper with 3 in 1 glue.

So, did I tell ya these are addicting?  They should probably come with a bitsy warning.

Domino Mini Book Tutorial Part 1


I am currently hosting a Domino Mini Book swap over at my Marie Antoinette Mail Art group.  I really wanted it to be easy for people to play even if they had never made one before, so I included a tutorial detailing exactly how I assembled my lil' books.  Another member, the sweet and amazingly talented Terri, at Artful Affirmations tried some of her own and suggested I share the very same tutorial with you.  So here goes...  :)

This PART 1 will detail the making of the Domino Mini Books.  In Part 2 and Part 3, I will share more photos of my finished books and tips too!  The measurements on this tutorial are for 1"x2" dominoes. You may need to modify if your dominoes are a tad larger or smaller.

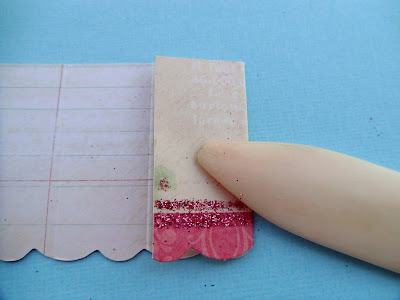
Cut your interior BASE paper to 1 7/8"x9". My paper here has a scalloped edge to add some detail, but same basic idea.

For your first score mark your paper should be facing up on the side you intend to decorate. (Here, I want to decorate the plainer, lined side; and leave the prettier glittered side for the back of the book undecorated. **Score at 7/8"

Flip paper over. Place first score mark at 7/8". Score again. 

Continue to flip paper over and score, with previously scored mark at 7/8". 

Fold in fan fashion on all scored lines. 

Back and forth, using folder to crease well.

You may notice an overhang on the very last page. (I over-measured the 9" to allow this on purpose.) Trim this off even with the folds. 

So here is how the BASE paper should look folded to allow for 10 interior pages, placed with your domino covers. 

***You will want to decorate your covers BEFORE you put your book together. Believe me, I did it both ways, and decorating (especially inking) the covers afterward was quite difficult.***

Cut lengths of ribbon or lace to tie the covers shut. Over measure to allow enough to tie a bow. You can always trim later. Glue to center line of each domino front and back (I used 3 in 1 again).

Then attach your fan folded BASE paper to the front cover, centering the space at each edge. Go light enough on the glue so it doesn't squeeze out onto your ties. 

Attach the back cover in the same way.

Before you attach your interior pages, you may want to distress ink your BASE paper sides, folds and creases. I cut my interior pages to 3/4"x 1 3/4". Here I did shorten that measurement a bit to allow for a nice border with the scalloped edge. 

So that's that.  :)  I hope this tutorial was useful to you and that you enjoy making your own teensy tiny mini books.  I find them quite addicting.  I always knew there would be a use for the favorite bitty scraps I have been holding onto.  Hee hee!

Happy Monday, Holls

Wednesday, April 13, 2011

Tissu Che'rit Le Journal Gift Kit

Not long ago, I participated in a wonderful Fabric Journal Gift Kit swap with my Marie Antoinette Mail Art Group.  My partner was the fabulous Debi who sent me the most gorgeous kit of delicious goodies.

Right when I opened the package I knew it was going to be special.  The doily was made by her husband's aunt at least over 40 years ago.  Debi wrapped each of my THREE boxes in pink tissue donned with lace and roses.  Inside that, two different sized Eiffel tower book boxes filled to the brim with journal making marvelousities.


Gosh this box of hand dyed fabrics, appliques, and doilies in the softest pinks and neutrals was positively Swoon Worthy!  The materials she sent were so totally inspirational for the journal I was about to create.


Vintage laces and trims and ribbons to make my mind go ga-ga with the possibilities.


A sweet floral hankie, stamped muslin, rosettes galore.  And tiny tied boxes perfect for trinkets and jewels.  And last but not least, the most demure little birdie girl you ever did see.


Was I spoiled?  Definitely.  Did I love it?  Every second.  {Grin}

You may click HERE to see the kit I sent lovely Debi.  It was just delightful to put together for her.  And be sure to check back soon to see my completed journal.

Friday, April 08, 2011

7gypsies Camden Easter Basket and Box

Wow I had so much fun creating with the 7gypsies Camden paper.  I decided to make some gift containers.  Great ideas for all the gifty stuff coming up: Easter, Mother's Day, Graduations, teacher gifts, not to mention my hubby's birthday and our 12th anniversary.

First I created a sweet little mini basket.  I used 3 paper lunch sacks which I cut down, layered, and glued together.  Then I added a crepe streamer ruffle and snipped it up to look like grass.  After that I covered the inside and out with rectangles of Camden paper.  I embellished with the gorgeous Prima flocked rub-ons.  I used 7gypsies tape to cover the seams and coordinate with the grass color.  I made the handle from an extra piece of paper bag wrapped with ribbon.


My favorite part of the project is (of course) the seam binding bow which I stamped with the Crafty Secrets Bonjour stamp set.


 The next project I made is an apple pie box.


Here is a close up of the amazing Prima flocked rub-ons.  They go on super smoothly and are raised up a bit for a really cool texture addition.


I hope these simple projects gave you some good gift giving ideas.  Be sure to click over the Sheri and Jenna's blogs to see their projects too.  Or drop by Mystic Paper in to see them all in person.